
When compared to the yesteryears, nail art is the talk of the town and there seems to be no particular age group who are attracted to different nail art designs. School girls, college girls, working women, homemakers almost every woman on earth wants to try out these trendy and super-cool nail art designs. And if you have happen to find any woman with plain nails that doesn?t mean that she is not interested in designing her nails, maybe she doesn?t know how to go about with it. And, that?s why we have before you a few simple nail art designs for beginners and we will also help you through this article to try those simple nail art designs by yourself. Not that parlors girls alone can do nail art, you can also! Try these simple diy nail art designs.
[To get amazingly pretty nail art designs you ought to have the best of nail art kits in the market. Look for our 6 Basic nail art products and buy the best among all.]
1. Simple Nail Art Design For Beginners

Now, this would be one of the simple nail art designs to begin with.
Steps:
- Keep your nails clean and ready to start with nail art designs.
- First, apply a white and black base coat for alternate nails.
- Bobby (bob) pins can be used to create polka dots and you can either use a nail art pen or an old pen refill to do the stripes.
2. Pretty Pink & White Polka Dots Design

Steps:
- Now how do you apply white nail polish only at the tips?
- When you are applying the pink nail polish use a cello tape to stay away from your nail tips.
- Then remove the cello tape and apply the white colored nail polish in the rest of the areas.
- Now apply dots vice versa.
3. Simple Red and Black Nail Art

Steps:
- Apply red nail colour as the base coat.
- Then, do the dots using a bob pin.
4. Super Stylish Nail Art

Steps:
- Doesn?t this nail art make you say OMG!!
- It?s simple if you follow the basics properly.
- Choose different nail colors and finish applying double coats.
- Once it is completely dried make the dots and to make the triangle, you first have to draw the partitioning line using a nail art pen and then color the gaps using different a nail polish. You can also do the cello tape trick to get a perfect little triangle.
5. Classic Black nail art

Steps:
- To achieve this nail art design, ?cut thin strips of cello tape and stick it on your nails.
- Now, paint your nails and then remove the tapes to achieve the above-shown look.
- You can also use your nail art brush and draw such thin stripes.
6. Simple & Elegant Tuxedo Nail Art
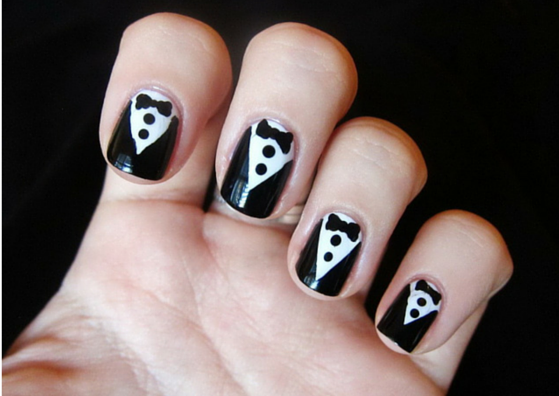
Steps:
- Begin with a base coat and then apply your black nail colour.
- Using your nail art pen, create a triangle and then paint the triangle white using the thin nail art brush.
- Once the white layer dries, create the dots and the bow.
7. Simple toe Nail art- Melon Nails

Steps:
- Apply red base coat and paint the tips green using your nail art brush.
- Draw a thin white line in between the red and green area.
- Create the dots and finish with a final gloss coat.
8. Simple Strawberry Nail Art

Steps:
- Yet another simple strawberry design for your nails.
- Cut your cello tape according to shape and size. Just cut one piece. That would do for all your fingers.
- Place the cello strip on your nails and then apply pink and red coats.
- Remove the tape and paint the remaining area green.
- Finish with the dots and final gloss coat.
9. Red & Black Nail Art

Steps:
- Simple yet cute red and black nail art design.
- Either use a cello tape or draw lines using your nail art pen.
- Fill the gaps.
- You get such rhinestones in the market specially designed to decorate your nail art design. Buy it separately or buy a nail art kit that will have everything for a perfect nail art.
10. Simple Nail Art With Strokes

Steps:
- The best choice for French manicured nails.
- Just apply a base coat and using a nail art brush do the stroke.
- As simple as that!!
11. Christian Bridal Nail Art

Steps:
- Buy a nice?light coloured glittery nail colour and apply a double coat.
- Then finish with the glossy final coat.
- Apply the base coat and stick the little stones. Once it dries, finish with the final coat.
12. Glamorous jatang nail art

Steps:
- Follow the thumb rule. Base coat and nail color double coat.
- Leave the area blank where you want to stick your nail art accessories. That?s it!
13. Simple Valentine Nail Art
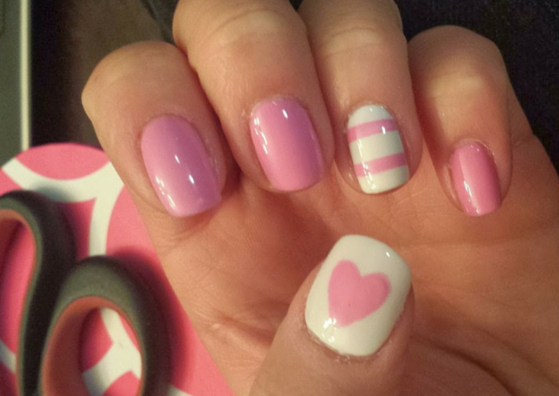
Steps:
- Begin with your base coat and then move to pink and white colour coats.
- Using your nail art pen draw thin straight lines.
- Cut a piece of cello tape and then polish the tips.
- Use a nail art pen and then draw a white line below the pink lines.
- You can either draw the heart and paint it pink or you can also use trendy heart stickers from your nail art kit.
14. Fruity Nail Art Design

Steps:
- Finish polishing your nails.
- These fruity stickers are available on online stores or you can purchase them from your nearby stores.
- Thinly slice the sticks and place it on your nails. They’ll stick to the wet nail polish itself.
- Then seal the sticker by applying the top glossy coat.
15. For The Lady in Red Nail Art

Steps:
- Base coat and double coats of bold red nail polish.
- Then use your nail art brush?and neatly create black lines only at the corners.
- Complete with a final coat.
16. Pretty Purple Nail Art

Steps:
- As usual start with the plain base coat and once it is dried out, finish the purple nail coating as well.
- Fingers that need a different colour, follow the same double coating method.
- Before the polish could dry, place the stones so that it’ll stick well to the wet polish.
- Using your nail art brush, draw the silver stripes on the purple base.
- Then, finish with a final glossy coat.
17. Doggy Nail art

Steps:
- Cute doggy nail art designs.
- This might look tough, but it?s easy.
- As usual paint your nails and once they are dry use a nail art pen and draw the designs.
- Dog?s nose needs a bigger dot. Use bob pins to get a perfect shape.
- If you can draw a heart, well and good, if not use a nail art stamp
18. Easy LadyBug Nail art

Steps:
- Cute Ladybug nail art designs.
- Apply red base. Let it dry. Then paint your tips black.
- Using your nail art pen create white eyes. Finish with the dots.
19. Super Trendy Nail Art

Steps:
- Cute different shapes of nail art stickers like shown in the above pic or use the cello tape trick and paint your nails to achieve this super-cool look.
- As usual start with the base plain coat and finish the pink colour nail coating.
- Then paint the different shapes with different colours.( either as shown in the above image or shades of your choice)
- And, do not forget the final glossy coat.
20. Classic Pink Nail Art Design

Steps:
- Begin with the base coat and then apply the pink nail colour.
- ?Once the white nail colour dries, finish the polka dots with a little heart at the corner.
21. Cute Teddy Nail Art

Steps:
- Apply your base coat and wait?for it to dry.
- Then finish with the blue colour nail polish coating.
- Once it dries, paint half your nails with a light cream colour. Then keep dots for the make the ears.
- Paint the mouth with white colour and finish with black dots for the eyes and nose. Using your nail art pen, draw the lines for the nose.
- A final gloss coating is all that you need to do.
22. Reverse strawberry nail art

Steps:
- First finish the base red coat.
- Then using your nail art pen, draw the border the wriggly outline and then paint it green.
- Finish it with black polka dots.
23. Elegant Printed Nail Art

Steps:
- Start with the base light brown coat.
- Once you are done with double two coats, transfer the print from the nail art stamp.
- Wait for it to dry and then finish with the final coat.
24. Poro Nail Art

Steps:
- To get this pop nail art done, first start with the ash base coat.
- Let it dry. Then do alternate polka dots using your bob pins.
- Using a tape, paint half your nails white.
- Then make the eyes and nose using pen or bob pin.
25. All time Black and White nail art

Steps:
- Simple yet classy black and white nail art design.
- Paint base coat black or white.
- Make polka dots and stripes using alternate colors.
- Accessories your nail art using bows.
D you imagine that doing nail art would be this easy? Try out these simple nail art designs each day and get to hear ?wow?, ?amazing? and ?choo sweet? comments from your kith and kin.
You?re welcome to come up with your own nail art designs. Please comment and share your designs.


